
 NGUYEN XUAN CUONG
Cài đặt Redmine 5 trên Ubuntu 22.04.2
Redmine là công cụ quản lý dự án đa nền tảng và cơ sở dữ liệu linh hoạt được viết trên Ruby on Rails Framework.

Tính năng Redmine
Một số tính năng chính của Redmine là:• Hỗ trợ nhiều dự án
• Kiểm soát truy cập dựa trên vai trò linh hoạt
• Hệ thống theo dõi vấn đề linh hoạt
• Biểu đồ Gantt và lịch
• Tin tức, tài liệu & quản lý tập tin
• Nguồn cấp dữ liệu và thông báo qua email
• Mỗi wiki dự án
• Mỗi diễn đàn dự án
• theo dõi thời gian
• Các trường tùy chỉnh cho vấn đề, mục nhập thời gian, dự án và người dùng
• Tích hợp SCM (SVN, CVS, Git, Mercurial và Bazaar)
• Tạo vấn đề qua email
• Hỗ trợ nhiều xác thực LDAP
• Hỗ trợ tự đăng ký người dùng
• hỗ trợ đa ngôn ngữ
• Hỗ trợ nhiều cơ sở dữ liệu
Cài đặt Redmine trên Ubuntu 22.04
Để bắt đầu, hãy đảm bảo rằng các gói hệ thống của bạn được cập nhật.Chạy cập nhật hệ thống
root@redmine:~# apt update -y
Redmine không khả dụng trên Ubuntu 22.04 mặc định, do đó, để cài đặt Redmine trên Ubuntu 22.04, bạn cần xây dựng và cài đặt nó từ nguồn.
Cài đặt các công cụ xây dựng và phụ thuộc cần thiết
Để cài đặt Redmine từ mã nguồn, bạn cần cài đặt các phụ thuộc và công cụ xây dựng cần thiết.root@redmine:~# apt install -y build-essential ruby-dev libxslt1-dev libmariadb-dev libxml2-dev zlib1g-dev imagemagick libmagickwand-dev curl gnupg2 bison libbison-dev libgdbm-dev libncurses-dev libncurses5-dev libreadline-dev libssl-dev libyaml-dev libsqlite3-dev sqlite3
Cài đặt máy chủ HTTP Apache trên Ubuntu 22.04
Cài đặt máy chủ web Apache và các mô-đun Apache cho Passenger, lightweight web servercho Ruby.
root@redmine:~# apt install -y apache2 libapache2-mod-passenger
Bắt đầu và cho phép Apache chạy khi khởi động hệ thống.
root@redmine:~# systemctl enable --now apache2
Cài đặt trình thông dịch Ruby
Phiên bản Redmine 5.0 hỗ trợ Ruby 3.0.
Ruby được cài đặt như một phần của gói phụ thuộc ở trên. Để kiểm tra phiên bản hiện tại của Ruby đã cài đặt;
root@redmine:~# ruby -v
ruby 3.0.2p107 (2021-07-07 revision 0db68f0233) [x86_64-linux-gnu]
ruby 3.0.2p107 (2021-07-07 revision 0db68f0233) [x86_64-linux-gnu]
Tạo người dùng hệ thống Redmine
Tạo người dùng hệ thống Redmine có thể được sử dụng để cài đặt các phụ thuộc Redmine Ruby thông qua lệnh bundler. Đặt thư mục chính của nó thành /opt/redmine vì đây là nơi chúng tôi sẽ cài đặt ứng dụng Redmine.
root@redmine:~# useradd -r -m -d /opt/redmine -s /usr/bin/bash redmine
Thêm người dùng máy chủ web Apache vào nhóm Redmine.
root@redmine:~# usermod -aG redmine www-data
Cài đặt MariaDB trên Ubuntu 22.04
Chạy lệnh bên dưới để cài đặt máy chủ cơ sở dữ liệu MariaDB trên Ubuntu 22.04
root@redmine:~# apt install-y mariadb-server
MariaDB được bắt đầu và kích hoạt để chạy khi khởi động khi cài đặt. Nếu chưa bắt đầu, hãy chạy lệnh bên dưới để bắt đầu;
root@redmine:~# systemctl enable --now mariadb
Chạy tập lệnh bảo mật cơ sở dữ liệu MariaDB ban đầu để xóa cơ sở dữ liệu mặc định, kiểm tra bảng, tắt đăng nhập root từ xa,
root@redmine:~# mysql_secure_installation
NOTE: RUNNING ALL PARTS OF THIS SCRIPT IS RECOMMENDED FOR ALL MariaDB
SERVERS IN PRODUCTION USE! PLEASE READ EACH STEP CAREFULLY!
In order to log into MariaDB to secure it, we'll need the current
password for the root user. If you've just installed MariaDB, and
haven't set the root password yet, you should just press enter here.
Enter current password for root (enter for none):
OK, successfully used password, moving on...
Setting the root password or using the unix_socket ensures that nobody
can log into the MariaDB root user without the proper authorisation.
You already have your root account protected, so you can safely answer 'n'.
Switch to unix_socket authentication [Y/n] y
Enabled successfully!
Reloading privilege tables..
... Success!
You already have your root account protected, so you can safely answer 'n'.
Change the root password? [Y/n] y
New password:
Re-enter new password:
Password updated successfully!
Reloading privilege tables..
... Success!
By default, a MariaDB installation has an anonymous user, allowing anyone
to log into MariaDB without having to have a user account created for
them. This is intended only for testing, and to make the installation
go a bit smoother. You should remove them before moving into a
production environment.
Remove anonymous users? [Y/n] y
... Success!
Normally, root should only be allowed to connect from 'localhost'. This
ensures that someone cannot guess at the root password from the network.
Disallow root login remotely? [Y/n] y
... Success!
By default, MariaDB comes with a database named 'test' that anyone can
access. This is also intended only for testing, and should be removed
before moving into a production environment.
Remove test database and access to it? [Y/n] y
- Dropping test database...
... Success!
- Removing privileges on test database...
... Success!
Reloading the privilege tables will ensure that all changes made so far
will take effect immediately.
Reload privilege tables now? [Y/n] y
... Success!
Cleaning up...
All done! If you've completed all of the above steps, your MariaDB
installation should now be secure.
Thanks for using MariaDB!
Tạo cơ sở dữ liệu Redmine và user cơ sở dữ liệu
Khi MariaDB được cài đặt, hãy đăng nhập với tư cách người dùng root và tạo cơ sở dữ liệu Redmine và người dùng cơ sở dữ liệu.Thay thế tên của cơ sở dữ liệu và người dùng cơ sở dữ liệu cho phù hợp.
root@redmine:~# mysql -u root -p
Enter password:
Welcome to the MariaDB monitor. Commands end with ; or \g.
Your MariaDB connection id is 41
Server version: 10.6.12-MariaDB-0ubuntu0.22.04.1 Ubuntu 22.04
Copyright (c) 2000, 2018, Oracle, MariaDB Corporation Ab and others.
Type 'help;' or '\h' for help. Type '\c' to clear the current input statement.
MariaDB [(none)]> create database redminedb;
Query OK, 1 row affected (0.000 sec)
MariaDB [(none)]> grant all on redminedb.* to redmineuser@localhost identified by 'mat_khau_tai_khoan_db';
Query OK, 0 rows affected (0.001 sec)
MariaDB [(none)]> flush privileges;
Query OK, 0 rows affected (0.001 sec)
MariaDB [(none)]>
Tải xuống và cài đặt Redmine
Điều hướng trang phát hành Redmine và lấy Redmine tarball cho phiên bản phát hành ổn định hiện tại. Thời điểm này là phiển bản 5.05( https://www.redmine.org/projects/redmine/wiki/Download#Stable-releases )
root@redmine:~# cd /opt/redmine/
Bạn chỉ cần tải xuống và giải nén tarball Redmine vào thư mục cài đặt Redmine, /opt/redmine.
root@redmine:/opt/redmine# VER=5.0.5
root@redmine:/opt/redmine# curl -s https://www.redmine.org/releases/redmine-$VER.tar.gz | sudo -u redmine tar xz -C /opt/redmine/ --strip-components=1
root@redmine:/opt/redmine# curl -s https://www.redmine.org/releases/redmine-$VER.tar.gz | sudo -u redmine tar xz -C /opt/redmine/ --strip-components=1
Cấu hình Redmine trên Ubuntu 22.04
Khi bạn đã cài đặt Redmine trong thư mục /opt/redmine, bây giờ bạn có thể tiến hành cấu hình nó.Chuyển qua user redmine
root@redmine:/opt/redmine# su redmine
redmine@redmine:~$ pwd
/opt/redmine
redmine@redmine:~$
redmine@redmine:~$ pwd
/opt/redmine
redmine@redmine:~$
Tạo tệp cấu hình Redmine bằng cách đổi tên các tệp cấu hình mẫu như hình bên dưới;
redmine@redmine:~$ cp /opt/redmine/config/configuration.yml{.example,}
redmine@redmine:~$ cp /opt/redmine/public/dispatch.fcgi{.example,}
redmine@redmine:~$ cp /opt/redmine/config/database.yml{.example,}
redmine@redmine:~$ cp /opt/redmine/public/dispatch.fcgi{.example,}
redmine@redmine:~$ cp /opt/redmine/config/database.yml{.example,}
Cấu hình cài đặt cơ sở dữ liệu Redmine
Mở cài đặt cấu hình cơ sở dữ liệu Redmine đã tạo và đặt chi tiết kết nối cơ sở dữ liệu Redmine cho MySQL.
redmine@redmine:~$ vi /opt/redmine/config/database.yml
Chỉnh sửa thông tin database như đã tạo phía trên
….
production:
adapter: mysql2
database: redminedb
host: localhost
username: redmineuser
password: "mat_khau_tai_khoan_db"
# Use "utf8" instead of "utfmb4" for MySQL prior to 5.7.7
encoding: utf8mb4
…..
production:
adapter: mysql2
database: redminedb
host: localhost
username: redmineuser
password: "mat_khau_tai_khoan_db"
# Use "utf8" instead of "utfmb4" for MySQL prior to 5.7.7
encoding: utf8mb4
…..
Lưu và thoát file
Cài đặt phụ thuộc Redmine Ruby
Đăng xuất với tư cách người dùng redmine.redmine@redmine:~$ exit
Là người dùng có đặc quyền, hãy điều hướng đến thư mục cài đặt Redmine và cài đặt các phụ thuộc Ruby.
root@redmine:~# cd /opt/redmine/
Cài đặt Bundler để quản lý các thành phần phụ thuộc Ruby
root@redmine:/opt/redmine# sudo gem install bundler
Tiếp theo, cài đặt các thành phần phụ thuộc Ruby cần thiết với tư cách là người dùng redmine.
root@redmine:/opt/redmine# su redmine
redmine@redmine:~$ bundle config set --local path 'vendor/bundle'
redmine@redmine:~$ bundle install
redmine@redmine:~$ bundle update
redmine@redmine:~$ gem install io-wait strscan webrick --user-install
redmine@redmine:~$ bundle config set --local path 'vendor/bundle'
redmine@redmine:~$ bundle install
redmine@redmine:~$ bundle update
redmine@redmine:~$ gem install io-wait strscan webrick --user-install
Tạo mã thông báo phiên bí mật
Để ngăn việc sửa đổi các cookie lưu trữ dữ liệu phiên, bạn cần tạo một khóa bí mật ngẫu nhiên mà Rails sử dụng để mã hóa chúng.
redmine@redmine:~$ bundle exec rake generate_secret_token
Tạo Database Schema Objects
Tạo cấu trúc cơ sở dữ liệu Rails bằng cách chạy lệnh bên dưới;Đảm bảo bạn đặt thông tin đăng nhập cơ sở dữ liệu chính xác ở bước trên
redmine@redmine:~$ RAILS_ENV=production bundle exec rake db:migrate
Khi quá trình di chuyển cơ sở dữ liệu hoàn tất, hãy chèn dữ liệu cấu hình mặc định vào cơ sở dữ liệu bằng cách thực thi
redmine@redmine:~$ RAILS_ENV=production REDMINE_LANG=en bundle exec rake redmine:load_default_data
Định cấu hình quyền của Hệ thống tệp
Đảm bảo rằng các thư mục sau có sẵn trên thư mục Redmine, /opt/redmine.
• tmp and tmp/pdf
• public and public/plugin_assets
• log
• files
Nếu chúng không tồn tại, chỉ cần tạo chúng và đảm bảo rằng chúng thuộc sở hữu của người dùng đã sử dụng để chạy Redmine.
redmine@redmine:~$ for i in tmp tmp/pdf public/plugin_assets; do [ -d $i ] || mkdir -p $i; done
redmine@redmine:~$ chown -R redmine:redmine files log tmp public/plugin_assets
redmine@redmine:~$ chmod -R 755 /opt/redmine
redmine@redmine:~$ chown -R redmine:redmine files log tmp public/plugin_assets
redmine@redmine:~$ chmod -R 755 /opt/redmine
Kiểm tra cài đặt Redmine
Việc thiết lập Redmine trên Ubuntu 22.04 hiện đã hoàn tất. Redmine lắng nghe trên cổng TCP 3000 theo mặc định. Do đó, trước khi chạy thử nghiệm, hãy mở cổng 3000/tcp trên tường lửa nếu nó đang chạy.redmine@redmine:~$ exit
root@redmine:/opt/redmine# ufw allow 3000/tcp comment "allow redmine"
root@redmine:/opt/redmine# ufw allow 3000/tcp comment "allow redmine"
Bây giờ bạn có thể kiểm tra Redmine bằng WEBrick bằng cách thực hiện lệnh bên dưới;
root@redmine:/opt/redmine# su redmine
redmine@redmine:~$ echo 'gem "webrick"' >> Gemfile
redmine@redmine:~$ echo 'gem "webrick"' >> Gemfile
Cài đặt webrick gem và kiểm tra quá trình cài đặt;
redmine@redmine:~$ bundle install
redmine@redmine:~$ bundle exec rails server -u webrick -e production
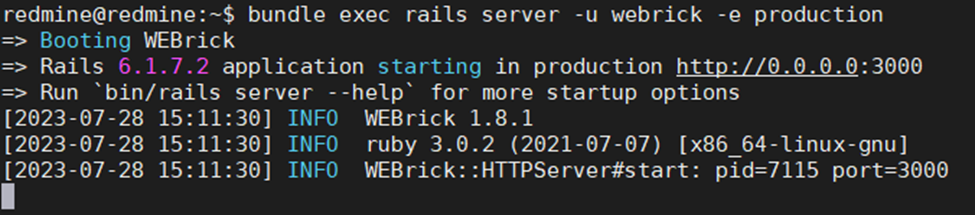
redmine@redmine:~$ bundle exec rails server -u webrick -e production
Điều hướng đến trình duyệt và nhập địa chỉ, http://server-IP-or-Hostname:3000. Thay thế máy chủ-IP-hoặc-Hostname cho phù hợp.
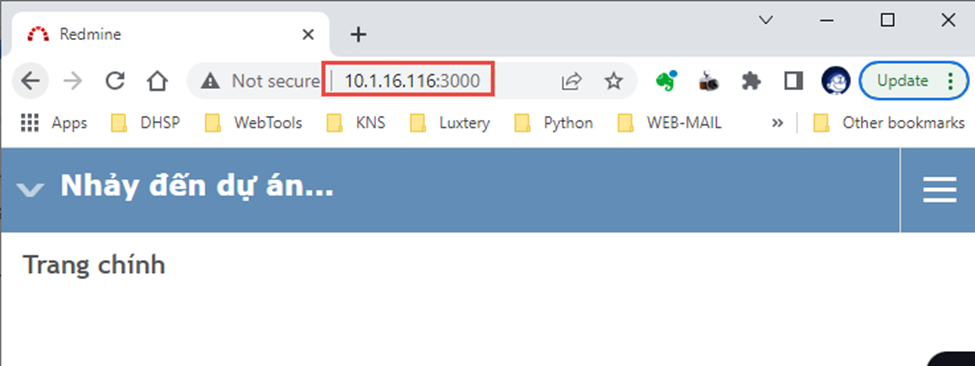
Nếu tất cả đều ổn, bạn nên chuyển sang giao diện người dùng web Redmine.
Cấu hình Apache cho Redmine trên Ubuntu 22.04
Bây giờ bạn đã xác nhận rằng Redmine đang hoạt động như mong đợi, hãy tiến hành định cấu hình Apache cho máy chủ Redmine.redmine@redmine:~$ exit
Tạo tệp cấu hình Redmine Apache VirtualHost.
root@redmine:/opt/redmine# cat > /etc/apache2/sites-available/redmine.conf << 'EOL'
Listen 3000
<VirtualHost *:3000>
ServerName pms.ued.udn.vn
RailsEnv production
DocumentRoot /opt/redmine/public
<Directory "/opt/redmine/public">
Allow from all
Require all granted
</Directory>
ErrorLog ${APACHE_LOG_DIR}/redmine_error.log
CustomLog ${APACHE_LOG_DIR}/redmine_access.log combined
</VirtualHost>
EOL
Kiểm tra cấu hình Apache để tìm lỗi.
root@redmine:/opt/redmine# apachectl configtest
Syntax OK
Syntax OK
Đảm bảo rằng mô-đun Passenger đã được tải;
root@redmine:/opt/redmine# apache2ctl -M | grep -i passenger
passenger_module (shared)
passenger_module (shared)
Nếu chưa được bật, hãy chạy lệnh bên dưới để bật.
a2enmod passenger
Kích hoạt trang web Redmine.
root@redmine:/opt/redmine# sudo a2ensite redmine
Vô hiệu hóa trang web mặc định;
root@redmine:/opt/redmine# a2dissite 000-default.conf
Tải lại Apache
root@redmine:/opt/redmine# sudo systemctl restart apache2
root@redmine:/opt/redmine# sudo systemctl enable apache2
root@redmine:/opt/redmine# sudo systemctl enable apache2
Kiểm tra để đảm bảo rằng Redmine hiện đang lắng nghe trên cổng 3000.
root@redmine:/opt/redmine# sudo lsof -i :3000
COMMAND PID USER FD TYPE DEVICE SIZE/OFF NODE NAME
apache2 7210 root 6u IPv6 52231 0t0 TCP *:3000 (LISTEN)
apache2 7239 www-data 6u IPv6 52231 0t0 TCP *:3000 (LISTEN)
apache2 7243 www-data 6u IPv6 52231 0t0 TCP *:3000 (LISTEN)
COMMAND PID USER FD TYPE DEVICE SIZE/OFF NODE NAME
apache2 7210 root 6u IPv6 52231 0t0 TCP *:3000 (LISTEN)
apache2 7239 www-data 6u IPv6 52231 0t0 TCP *:3000 (LISTEN)
apache2 7243 www-data 6u IPv6 52231 0t0 TCP *:3000 (LISTEN)
Truy cập Redmine trên Trình duyệt
Tiếp theo, bây giờ bạn có thể truy cập và đăng nhập vào Redmine trên trình duyệt bằng địa chỉ http://server-IP-address:3000.
Thông tin xác thực mặc định: admin:admin
Cài đặt các gói GEM
root@redmine:~# chown -R redmine.redmine /var/lib/gems
root@redmine:~# su redmine
redmine@redmine:~$ bundle update
redmine@redmine:~$ gem install kaminari
root@redmine:~# su redmine
redmine@redmine:~$ bundle update
redmine@redmine:~$ gem install kaminari
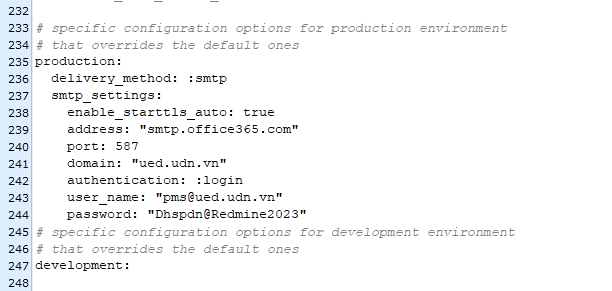
Cấu hình email
mở file /opt/redmine/config/configuration.yml và thêm dưới dòng production: delivery_method: :smtp
smtp_settings:
enable_starttls_auto: true
address: "smtp.office365.com"
port: 587
domain: "ued.udn.vn"
authentication: :login
user_name: "pms@ued.udn.vn"
password: "xxxxx@Redmine2023"
smtp_settings:
enable_starttls_auto: true
address: "smtp.office365.com"
port: 587
domain: "ued.udn.vn"
authentication: :login
user_name: "pms@ued.udn.vn"
password: "xxxxx@Redmine2023"
CÁCH CÀI ĐẶT 1 PLUGIN, VÍ DỤ PLUGIN MICROSOFT TEAMS
chuyển qua tài khoản redmineroot@redmine:/opt/redmine/plugins# su redmine
di chuyển vào thư mục plugin
cd /opt/redmine/plugins
tải plugin về từ github
redmine@redmine:~/plugins$ git clone https://github.com/wellbia/redmine_microsoftteams.git redmine_microsoftteams
Cài đặt plugin
redmine@redmine:~/plugins$ bundle install
Quay lại tài khoản root
redmine@redmine:~/plugins$ exit
Sau đó restart lại service apache
systemctl restart apache2
* tham khảo cài đặt plugin: https://www.redmine.org/projects/redmine/wiki/Plugins
Một số Plugin cho Redmine 5.0
### Cài đặt plugin change avatar
https://github.com/ncoders/redmine_local_avatars
### Plugin cho MSTeams
git clone https://github.com/wellbia/redmine_microsoftteams.git redmine_microsoftteams
git clone https://github.com/RedminePower/redmine_teams_button.git
Danh mục
Thống kê truy cập
- Đang truy cập3
- Hôm nay92
- Tháng hiện tại1,177
- Tổng lượt truy cập210,949